Vendor Resources
Configuring Products and Menus
Pre-Requisites
Learn about being a Vendor at a FastBar powered-event
Be sure you have Accepted an Invitation to your FastBar event
If your Event Vendor Coordinator has invited you to a FastBar event and given you permissions to edit your own Products and Menus, there are 2 key concepts you need to know:
Products - an item that you want to sell
Menus - a grouping of products for display on a Point of Sale device
You should add Products first, then configure those Products onto a Menu.
Add Products
You can add a Product by clicking the "Add New Product" button:

Then, add your Product:
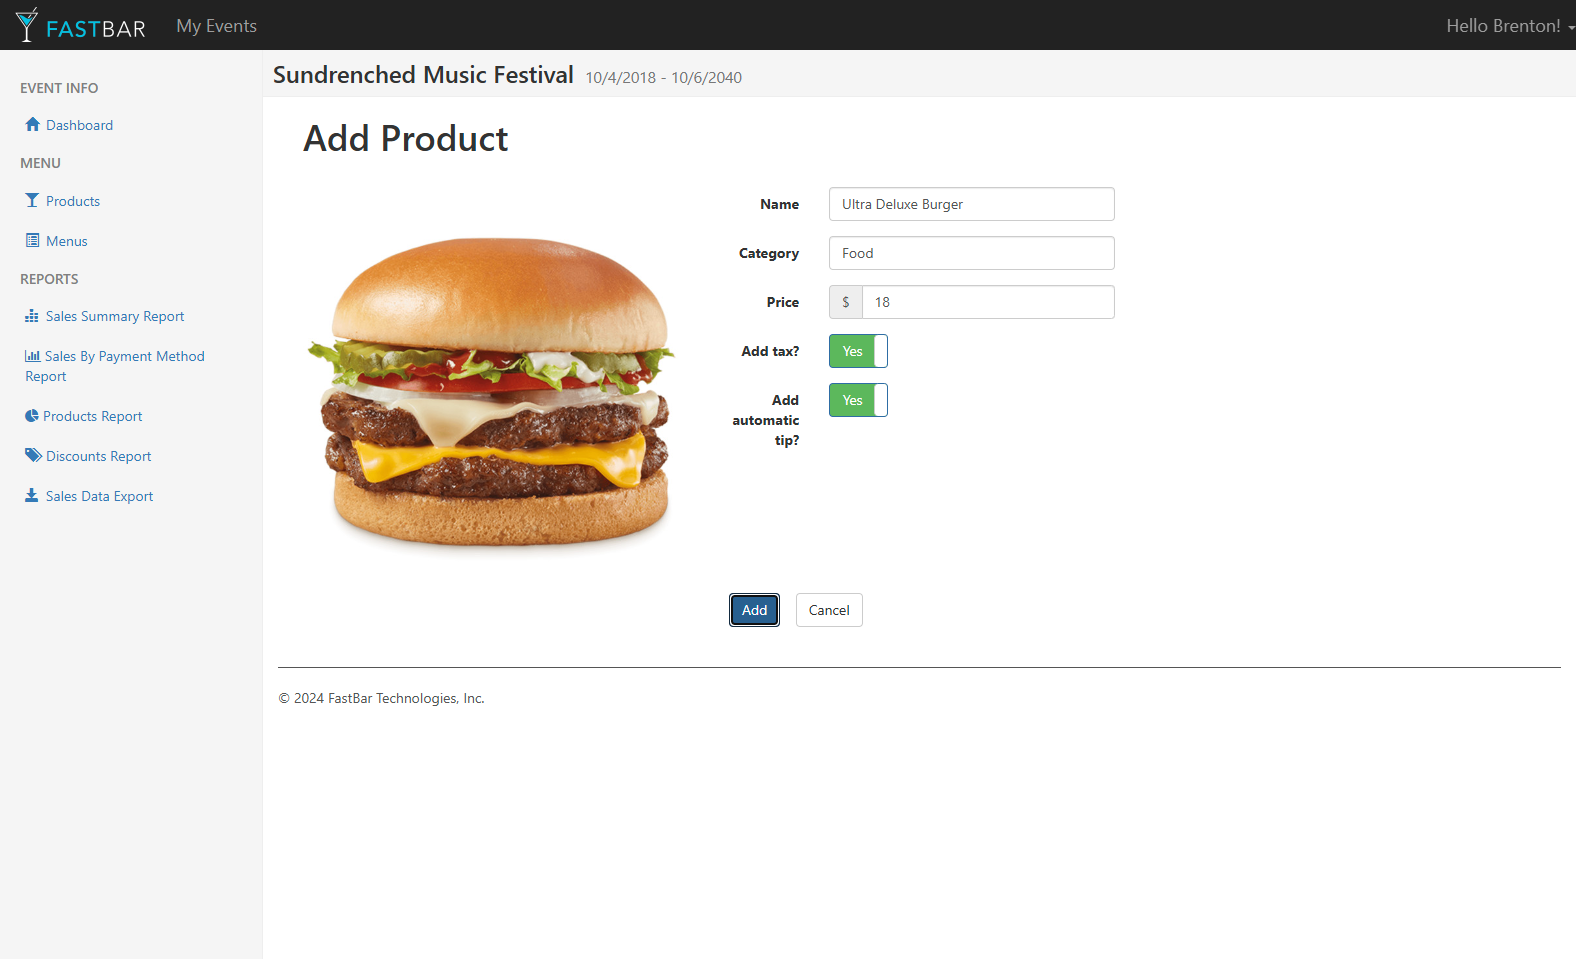
Image: click the image to upload your own image, or link to an image online, or search for an image using our built-in image search feature. Note, images must be at least 600px x 600px in size.
Name: the name that will be displayed on the Point of Sale and receipts.
Category: the category of the product, useful for grouping items on the Point of Sale, or in reports.
Price: the price of the product.
Add Tax: determines if tax, if defined at the Event level, would be added to this item. This may or may not be editable depending on the settings for your event. Contact your Event Vendor Coordinator for information on your specific event.
Add automatic tip: for RFID events, this determines if an automatic tip, if defined at the Event level would be added. This may or may not be editable, depending on the settings for your event. Typically auto tip would be added to food and beverage items, but not merchandise items. Contact your Event Vendor Coordinator for information on your specific event.
Note: Custom Items on the Point of Sale
If you have a large number of SKUs that would be impractical to setup in FastBar (for example, you are a merchandise vendor), or if you need to sell items where you don’t know the price ahead of time, or if the price may vary, you can use FastBar’s Custom Item feature.
When enabled, you will be able to input the name and price of the Product directly on the Point of Sale, no need to set it up in the Event Control Center ahead of time.
Contact your Event Vendor Coordinator for information on having this feature enabled for your event.
Editing Menus
When you add a Product, it will automatically be added to your Default Menu, and will appear on your Point of Sale device at the event.
You can rearrange items on your menu as you see fit:
Go to the Menus page in your Event Control Center
Edit the Default Menu
When editing your Menu:
You can change the order in which your Product buttons will appear on the Point of Sale by rearranging them in the right-hand column
You can remove items from your menu by dragging them from the right column to the left column
You can add them back to the menu by dragging them from the left column to the right column:
Adding Additional Menus
In general, most Vendors only need one Menu setup for the event, containing all the products they plan to sell.
In certain cases, however, it can be useful to have more than one Menu. For example, a Vendor operating multiple food carts (such as a pizza cart and a hotdog cart) would likely benefit from separate Menus, since each cart offers very different products. In this scenario, you could have one Menu for the pizza cart and another for the hotdog cart.
If you believe you need multiple Menus, please contact your Event Vendor Coordinator to request access to this feature.
Recommendations for Creating Products and Menus
To ensure the fastest possible service for Attendees at your event, we recommend the following:
Keep the product offering simple - while it may be typical for you to sell a large number of items in regular day-to-day operations, events benefit from a simpler, more streamlined product offering.
For example, if you ran a regular bar, you may have 10+ beers on tap, a variety of selections in bottles and cans, many different wines available by the glass or bottle, and 10+ different brands of vodka, tequila, whiskey etc… At an event bar, you may just have 3 kinds of beer, 2 wines, and 1-2 of each different kind of spirit on offer. Since event bars are often high-volume and require setup for speedy service, the simpler the product offering, the easier and quicker it will be operationally.
The same applies if you’re a restaurant who sells burgers, or a coffee cart selling beverages - the simpler your product offering, the better. Attendees prefer speed of service over a large selection.
Group items logically and place the most popular items first. To make it easier for your staff, we recommend grouping items logically and placing the most popular items at the top. For example, if you were operating a bar serving beer, wine, liquor, and non-alcoholic drinks, and you were expecting a beer-heavy crowd, you would likely want to group all of the beers together, and place them up the top, followed by the liquor, followed by the wine, followed by the non-alcholic drinks (if you expected that to be the order of popularity).
Consider consolidating similar products to a single button - let’s say you have 6 different soft drinks or sodas available for purchase at the same price. You have a couple of options on how to set these up:
You could setup 6 individual Products for each different soda, which will mean 6 different buttons on the Point of Sale. This is a bit more complex for the operator, since they have to choose from 6 different buttons, however, you will get more granular reports, and you’ll know exactly how many of each variety of soda you sold
Or, you could setup a single “Soda” Product, meaning a single button on the Point of Sale. This would be simpler for the operator, since there is just a single button, but would also be less granular in the reporting, since you’ll know how many sodas you sold, but not the breakdown of different varieties of soda.
We recommend going for the simplest setup that will still give you the reporting granularity that you need.
Use a single menu - a Menu is a grouping of Products for sale at a particular location. In most cases, a Vendor at an Event will just need a single Menu. If you find you need multiple menus (ie you have different locations within the event that need to sell different products), please reach out to your Event Vendor Coordinator and request the ability to create additional Menus be enabled on your account
Keep the number of products on a menu under 25 - wherever possible, we recommend keeping the number of products on a particular menu under 25. This can be done with a combination of keeping the product offering simple, and consolidating products where you can.
The FastBar POS will automatically adjust the size of buttons on the menu depending on how many items you have on offer. Up to 25 items will be displayed at once on the screen. Once you exceed 25 items, the menu will become scrollable so that the operator can access other items, however, if you keep it under 25 items, everything is front and center for quick and easy access.
Questions
If you have questions that relate to the event or your participation as a Vendor in the event, please reach out to your Event Vendor Coordinator.
We look forward to working with you at the event!